Most cases of shoulder arthritis are, by the time they present to the surgeon's office, sufficiently far advanced that prosthetic shoulder arthroplasty is the primary consideration. However, in some cases of early arthritis the shoulder is stiff and painful without complete destruction of the joint surfaces. In these cases, if range of motion exercises are not successful in improving the patient's condition a debridement of scar tissue, capsular release, excision of osteophytes and possibly micro fracture of bare areas of the joint surfaces may be considered.
We usually approach the stiff shoulder through a deltopectoral approach, which allows access to the rotator interval, the motion interface, the subscapularis, and the glenohumeral joint capsule. The surgical release is analogous to the subscapularis and capsule release performed during a glenohumeral arthroplasty.
We proceed sequentially through a series of distinct stages of shoulder release, reassessing the range of motion after each stage. We continue through these stages until the desired motion is obtained.
Stage one: re-establishment of the humeroscapular motion interface. Normally there is substantial excursion at the humeroscapular motion interface between the cuff and the overlying deltoid and coracoacromial arch. However, in stiff shoulders, adhesions or "spot welds" can form between the deltoid, acromion, coracoacromial ligament, coracoid, and coracoid muscles on one hand and the rotator cuff and humerus on the other. These spot welds can virtually eliminate motion at the interface. Thus, each area of the interface needs to be smooth and free of adhesions for the shoulder to achieve its normal range. At times the motion interface can be obscured and difficult to identify.
In the "totally stuck shoulder" we start under the acromion, knowing that it is part of the outer aspect of the motion interface. Dissecting beneath the acromion and coracoacromial ligament with a knife, we can free the subjacent cuff tissue. By rotating the humerus internally and externally during this step of the dissection we continue the dissection under the coracoacromial arch to the coracoid. Then the sharp dissection proceeds beneath the coracoid and coracoid muscles, freeing the subjacent subscapularis muscle.
Adhesions between the coracoid muscles and the subscapularis cause a major limitation of external rotation owing to the magnitude of interfacial motion here. It must be remembered that the brachial plexus, especially the musculocutaneous and axillary nerves, are close by and vulnerable. Thus we stay lateral to the coracoid muscles (the "safe side") dissecting on the surface of the subscapularis as it is externally rotated, rather than diving medial to the coracoid muscles (the "suicide").
In a similar manner, sharp dissection continues laterally from the acromion to reestablish the motion interface between the deltoid and the rotator cuff. Again, the nerve supply, in this case the branches of the axillary nerve, lies in the motion interface. We avoid them by keeping our sharp dissection on the superficial aspect of the rotator cuff and proximal humerus. If the dissection enters the deltoid muscle, its nerve supply, the axillary nerve, is at risk.
Stage two: opening the rotator interval. Tightness at the rotator interval can substantially restrict the range of glenohumeral motion. We release the rotator interval by sharply dissecting the subscapularis and supraspinatus tendons free from their moorings to the base of the coracoid. We verify the completeness of this release by passing a blunt elevator between the tendons on both sides of the coracoid process.
Stage three - reestablishment of subscapularis length and excursion. The subscapularis and anterior capsule may be contracted and scarred. In the past we performed a coronal plane "Z" lengthening of the subscapularis tendon and capsule using a step cut. We no longer use this approach in that it weakens the tendon. Instead, we release the capsule from the glenoid and perform a "360 degree" release of the subscapularis tendon from the coracoid muscles anteriorly, the axillary nerve below, the capsule and scapular neck posteriorly and the coracoid above. This release should reestablish the normal "bounce" and excursion of the subscapularis.
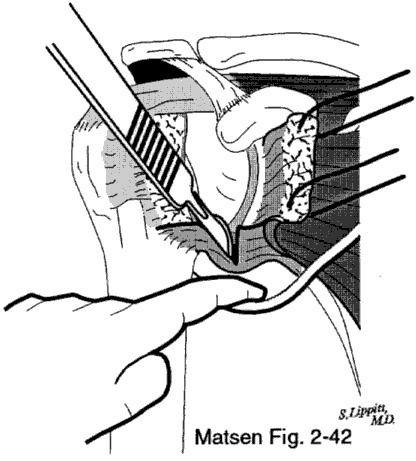
Stage four - 360 degree release of the capsule. Capsular tightness is a major component of the stiff shoulders. In the surgical release, we section the tight capsular tissue just lateral to the glenoid labrum. The capsule is then released selectively circumferentially around the perimeter of the glenoid. The circumferential capsular release is started anterosuperiorly, then carried down the anterior glenoid. We next release the inferior capsule sharply while a finger protects the axillary nerve. We then expose the origin of the triceps from the infraglenoid tubercle with this release. We insert a humeral head retractor into the joint and twist it slightly to tension the posterior inferior capsule so that it can be safely sectioned. By twisting the retractor a little more with each bit of posterior capsular release, we can safely release the posterior capsule up to the origin of biceps tendon at the supraglenoid tubercle.
While the joint is exposed, osteophytes can be resected and isolated bare ares of cartilage can be micro fractured.
Before closure and gentle manipulation under anesthesia maximizes the range of motion at the release.
At the conclusion of the procedure the subscapularis tendon is repaired to the lesser tuberosity.
Figure 1 - Axillary nerve 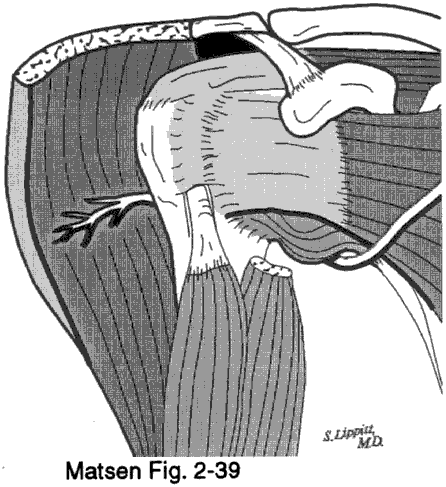
Click to enlarge
Figure 2 - Subscapularis lengthening 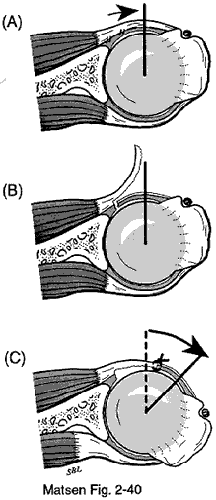
Click to enlarge
Figure 3 - "360 degree" release

Click to enlarge
Figure 4 - Releasing the inferior capsule sharply while a finger protects the axillary nerve
Click to enlarge
Figure 5 - Releasing the posterior capsule up to the origin of biceps tendon at the supraglenoid tubercle 
Adequate release
The hallmarks of an adequate release are:
- translation of the humeral head on the posterior drawer test of at least 1.5 centimeters,
- a "scarecrow" test demonstrating almost 90 degrees of internal rotation of the arm elevated 90 degrees in the zero degree thoracic plane,
- at least 45 degrees external rotation with the arm at the side, and
- total elevation of the arm to at least 140 degrees.
After the surgery
Continuous passive motion and exercise
As soon as the procedure is completed, we place the arm in continuous passive motion. Early motion achieves several goals. It prevents formation of adhesions or scarring during the critical early healing period. It also demonstrates to the patient that the shoulder can and should be moved immediately. Finally, early movement seems to increase the comfort, speed, and completeness of motion recovery. The use of the continuous passive motion after surgery is greatly facilitated by a brachial plexus block for the surgical procedure. This type of anesthesia can give 12 to 18 hours of post-operative anesthesia, allowing the awake patient the opportunity to observe the increase in motion gained by the procedure without experiencing early post-operative pain.
On the first day after surgery, the patient resumes the stiff shoulder exercises. Each day the patient is in the hospital, we plot the range of elevation (overhead reach) and rotation on charts posted in the patient's hospital room. These charts (see figures) provide positive reinforcement for the patient's progress.
Ideally, before discharge the patient can demonstrate comfortable assisted motion to 140 degrees of elevation, 40 degrees of external rotation, internal rotation until able to reach T12 with the thumb, and cross body adduction comparable to the normal side. The wall charts reflect these discharge goals. With this program, the patient becomes the center of the treatment team and is motivated to continue the exercises after discharge.