Harborview Trauma Call Info
To Download the following as a PDF document, click here.
UWSOM OSSMIG Harborview Trauma Call Guide 2021
Spending a night helping the Orthopaedic Surgery service evaluate, manage and treat patients with injuries in the ED is great chance to get to know the residents, gain real world experience with Orthopaedics, learn musculoskeletal medicine and get involved outside the classroom.
Ortho Call at HMC can be very busy with the shear volume of patients that the residents see as the consult resident. Most of these consults require a reduction of a fracture or relocation of a joint, and then splinting and/or pinning to stabilize the limb. Each consult can thus be very labor intensive. In the first half of the year, 4th year medical students come from all over the country to do sub-internships at HMC and help out the person on call to see if this is the kind of program for them. The second half of the year residents don’t have any additional help. This is where you as UW medical students come in.
This guide will help you once you’re in the thick of things. Here we attempt to break it down, highlight key things, answer frequently asked questions and help making this whole process bit easier for you.
GENERAL INFO
- Carry note cards & take notes on important info/pearls/questions/patient/operations
- It will be a busy but fun night. Many say it is the most rewarding thing they've done in their preclinical years.
- Be prepared to work hard!
- Be enthusiastic with a good attitude. Be yourself as much as possible.
- Know your anatomy and physical exam.
- Constantly Anticipate
- “What can I do to make the team more efficient.”
- E.g. have tape and dressings ready before the asked
- Know which forms to always have on hand
- “What can I do to make the team more efficient.”
- Don’t try and show up fellow medical students. Don’t try to show up residents.
- That being said, ask question when you have them and answer them when asked
- Be nice to ancillary personnel. They know a lot and have been around longer.
CALL SIGN UP & SCHEDULING
Student scheduling is coordinated via an established Calendar on the OSSMIG Website: http://www.orthop.washington.edu/ossmig/harborview-trauma-call.html
If you cannot make your date any longer, please email the listserv (ossmig_members@uw.edu) at least 1 week prior to your scheduled date/time to let others know of that availability and remove your name from the calendar! Remember that Residents are counting on the assistance medical students provide, it is imperative that you honor your commitments.
BASIC SEQUENCE OF EVENTS
How do I prepare the day before?
Eat well and get plenty of sleep the night before. Residents really appreciate it if the medical students planned to take 12 (weekday) or 24 hour (weekend) shifts. This allows them to spend more time teaching instead of orienting, and should provide the best experience for everyone. Another key piece of advice to make it through a long evening is to stay hydrated. It's easy to forget to drink when there's a lot going on, but it's a lot easier to stay awake and functional when you're hydrated.
What should I read about beforehand?
The most common consults are ankle fractures and boxer's/distal radius fractures. Prioritize reading about the mechanism, presentation, diagnosis, and treatment of these most common fractures ahead of time so you will have a general idea what is going on. The reality is you may see just about anything, from femur and tibia fractures to pelvic and acetabular injuries, to spine injuries. You will be able to pick up information regarding these conditions on the fly. Feel free to ask questions and pursue suggested reading articles. If there's something that the Resident may not know as well as they would like, sometimes the most helpful thing is for you to assist in looking it up.
Where do I go when I arrive?
When you arrive at Harborview, the best place to enter is through the Emergency Department entrance. You can go to the Ortho Resident call room (listed below under “Good Places to Know at HMC” - Harborview Central Tower 6th floor, 6CT 55) at the start of your shift and someone will be in the room to help direct you where to go and provide you with the on-call resident contact info.
When should I arrive and what should I do when I get there?
On weekdays, you should plan on showing up between 6 and 7pm. On weekends please arrive around 6:45 am (NO later than 6:55am), as sign-out occurs at 7am. Sign-out can be an excellent learning experience, as Residents will go over cases in the morning that will be handed off to the oncoming team. These discussions often revolve around ER workup, management, and indications for surgery, etc.
To page the Ortho resident, dial 4-3000 (or 744-3000 from an outside line) and ask the operator to page the orthopedic consult resident to whatever number you are at. Tell them you are a UW medical student who is signed up to follow them around. Whoever is on-call can direct you and give you a quick orientation. If it is busy, they may have the intern do those things. If you want to make your lives easier, pick up scrubs and drop your stuff off in the sixth-floor Ortho Resident room beforehand (see “Good Places to Know” section for directions).
What are the expectations and what will I be doing?
Residents really need your help. Sometimes that means having you scribe while they perform a history and physical exam, and sometimes that will mean helping hold a leg and/or getting splint/local anesthetic material ready. Anything that you can do to expedite the team’s ability to see patients makes you invaluable. Just be aware that different residents will have different comfort levels with having you do things. The more you work with us and the more you seem to know, however, then the more comfortable they will feel giving you some level of responsibility/autonomy.
GOOD PLACES TO KNOW AT HMC
Orthopedics Resident Room
Central Hospital, 6th floor 6CT55 Code: 573553
Emergency Room
East hospital, 1st floor
Operating Rooms
East hospital, Basement
Best if take central elevators (back of ER) down to B. The OR will be one way, the cafeteria the other. • Locker Rooms- Ask. They are gender specific.
Scrubs
Can borrow from locker rooms (1W near ER for women, or G floor below ER for men) • Also easily located on 9E in unlocked supply closet.
Cafeteria
East hospital, Basement • Best if take central elevators (back of ER) down to B. The OR will be one way, the cafeteria the other.
EMERGENCY ROOM DETAILS
What is the Harborview ER like?
The ER is built in sections (Medicine [blue], Triage [green], and Trauma). Radiology is in the middle of it all. You will spend most of your time on the Trauma Side of the ER. The trauma side is made up of Rooms: Med (bed1&2), Resus 1(beds 1&2), Resus 2 (beds 1-4) & Resus 3 (beds 1- 4). There is a front desk where labs are sent. They can answer most of your questions. The ‘fishbowl’ is the work area where the ER residents, attendings, and med students work. The Ortho consult and Surgery consult also have a station here.
What forms and processes should I have knowledge of?
- General Ortho Consult Sheet – used by residents to keep track of patients and all relevant H&P information. This is where they will put patient stickers once they get a consult
- Consent Forms
- Needed for traction pin and for those who will go to surgery
- List all possible procedures (no abbreviations).
- List all possible surgeons
- Must be signed and consented by resident
- When there is a break and the Resident is running their list of Consults. See if they need help adding the consults to CORES.
- You will be shown how to do it the 1st time. In ORCA go to CORES, find the list for the team that is on that night (Red, Blue, Green), or Spine, Hand, etc. Add patient from menu, add from ED census and make 1’ or 2’ depending on the consult and admitting team.
Where is stuff located and how do I get it?
Collecting and preparing resources for Residents when needed is a huge help. With experience, you will hopefully develop the ability to anticipate need be prepared before called upon.
Always have the following in your pockets:
- Shears
- Paper Tape
- Consent Forms
- Notebook / Notecards to write down info/questions
Necessary resources can be found in the following supply locations:
- Ortho ER Supply Room: Located at end of hall on left before elevators. Code: 7-3-1- 7-3-1
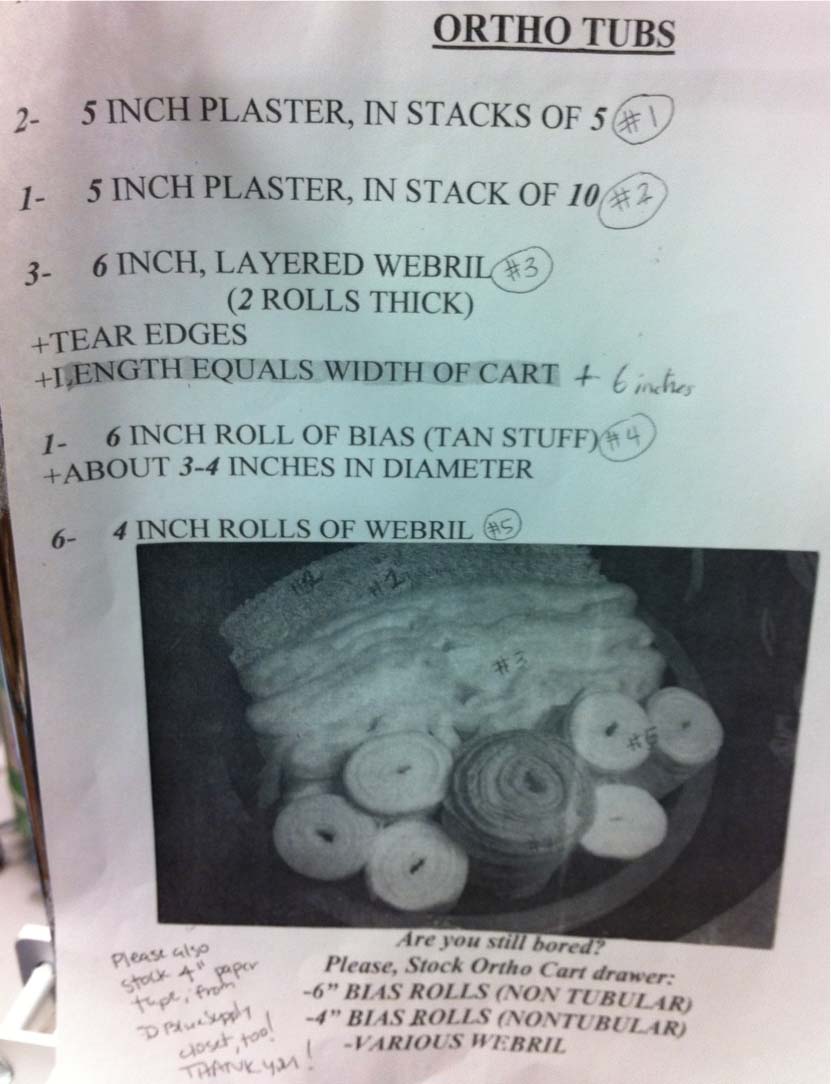
- Splinting tubs: Volunteers should have plenty made up.
- It’s very helpful if running low and ER is low to anticipate and help prepare a few if you’re bored.
- Plaster
- You know what this is. Get wet and it hardens.
- Warmer water = faster hardening
- Webril
- White cotton wrap
- Cushioning. Wrap around extremity before applying plaster. Extra around any bony prominences
- Bias
- Tan wrap for wrapping splint and making it look good and comfortable.
- Other Supplies: Slings, Crutches, etc. Cam Boots located under PT desk.
- Splinting tubs: Volunteers should have plenty made up.
ER Supply Room #1: Located in the back between ED Blue & Green. o Supplies not located in ED Supply Carts or Supply Room #2 o Medipore tape, crutches, etc...
ER Supply Room #2: Located in the back corner near radiology MRI – 1WH 408. o Supplies not located in ED Supply Carts or Supply Room #1 o Non stick dressing, kerlex, etc...
ER Supply Carts: Located around ER & at every Resus bay bed. o Holds most commonly used supplies. Labels on drawers o Needles, sterile gloves, water nozzles, suturing set, stapler, etc.
Warmerator: Located in hallway between Resus 2 & 3. o Warm 1L Saline bottles found here. o Will use plenty for irrigating wounds. o Use nozzles or puncture multi-holes in top with an 18g needle.
Utility Room: Located on corner across from Med Room. o Place used tools and pin sets in the bins on the left. o Plaster water can ONLY be dumped into the sink in this room.
Other commonly used supplies not found in the above locations are:
- Steinmann Pin Set:
- Located in Resus 2 on bottom of back Left wall
- Used for placing distal femoral or proximal tibial traction pins
- Sutures:
- Ask the back desk nurse for the suture cart key
- The Surture cart is located in the back hallway by social work
- Large Clamps:
- Located on back left wall of Resus 2
- In bin on wall, commonly hidden under Steinmann Pin Pets in bin
- Used for sheeting pelvis
- Mini C-Arm:
- Located in hall back near ortho supply room
- Plug in, turn on (green switch), and login (password = x-ray). Fill in anything for required for and proceed to perform evaluation. Set on ‘continuous’.
- Used for assessment and reduction of fractures.
- Traction Cart:
- Located in hall back near social work o Used to setup traction and hang weights
- Located in hall back near social work o Used to setup traction and hang weights
- Stickers:
- Located by each patient, on desk, or attached to clipboard
- Give one to the Resident
- Print Stickers – they may run out of stickers when you need a bunch to order XRays.
- Go to those seated at computers at the wall behind the back ER desk and ask then to print up stickers for the patient. Grab some and return them to the bedside.
- Box Splints:
- Located in the Ortho Supply Room.
- Prior to procedures and before X-Ray evaluations likely fractured or known fractured extremities are always placed in a box splint once the patient’s primary survey is completed by the trauma surgery ED team. Help by taking down the clothing and removing current splints/supports and placing them into box splints.
- Place towel in them for patient comfort.
- Tape them into place.
How can I help prepare for common procedures?
This is another great opportunity to anticipate and help make procedures run smoother. If you aren’t actively doing something, always ask yourself if there is a patient that will soon need a reduction/splint/traction pin/suturing. If so, look like an all-star and start setting up everything so the Resident and you can just jump in and perform the procedure when everyone is ready. Regardless of the procedure begin by getting consent forms prepared, stickered, and work on H&P. After, you can begin procedure specific preparations:
Suturing
Ortho Residents are not commonly needed for this. The ER resident taking primary care of the patient can do this, but if splinting is delayed then we commonly help out and do it. If you know how to do this, you can with Resident permission. Can do this yourself after the small wounds are irrigated. Check with the resident. Especially for wounds located where a splint will soon be applied.
Need:
- Sutures, suturing set (lac repair kit), gauze, etc. (See above where this stuff is)
- Overhead lights are at each Resus bed. Knob to turn on is hidden on back wall.
Distal Femoral Traction Pin
Pin placed to hold traction. Most often placed for femoral shaft fracture, acetabular fractures, and occasionally hip fractures. There is also a variation called proximal tibial traction pin which requires the same set up but is placed in the proximal tibia.
Need:
- Steinmann Pin Set
- Setup sterile set on stand
- Sterile Gloves (for resident & you)
- 4x4 tub with betadine
- Lidocaine drawn up with 18g. Label & get new 22g needle.
- Traction Cart
- Will need to setup at end of bed once pin placed. 2 vertical, one cross bar, (+/-) extension piece, pully, weight (10-15 lbs), rope
Splints
Need for all splints:
- C-Arm (if reduction needed)
- Tub with warm water. Place on towels to make cleanup easier
- Shears
- Medipore paper tape (4” usually, though 2” for UE sometimes)
- Splinting Supplies (differs depending on injury)
- The TUBS for Short Leg Splints already made up in Ortho Supply Room
- Make own TUB or add to them depending on what splint you’re making
Short Arm Splint
- 4” wide plaster used - corners of plaster rounded or bend in
- 4”x15” plaster. 7-8 pieces thick x 2 (1 anterior & 1 posterior)
- 3” & 4” webril
- Bias & tape
Long Arm Splint
- Same as short arm + 2 more 7-8 thick plaster slabs (4 slabs total)
- Extra webril & bias
Lower Extremity Splints
- 5” wide plaster used. 30” and 2 extra 15” or long leg § Short Leg Splint
- 4”x30” plaster. 5 piece thick slabs x2 (sides) + 10 thick (posterior)
- 4” & 6” webril
- 3 layerd webril slabs with edges torn
- 6” Bias & tape
- Long Leg Splint
- Same as short leg + 2 extra 5”x15” 5-8 thick plaster slabs (sides of long leg)
- Extra webril & bias
How can I help after procedures?
Splinting and pinning can get messy. After you finish it is easy to help clean up the area. Towels and sheets go into the white square laundry bins. Bloody and soiled items into the biowaste red containers. Scraps of trash into the garbage cans. Traction pin supplies are placed in the utility room bins. Plaster water into the utility room sink. Traction cart or C-arm returned to the hallway. Wipe down the C-arm prior to putting it away.
Is there anything else I can do?
BE HEALTHY - Get some exercise or take a walk. Use the stairs when going only a few floors instead of the elevator. Most importantly stay hydrated when on call. You’ll be surprised how you forget to eat and drink overnight when you are super busy in the ER. Take a quick break and grab some water throughout the night. During a break or when waiting for a patient to get X-Rays tell the resident you’re heading down to the cafeteria and grab a quick bite.